ESP32 ADC Speed

I couldn’t find any usable info about the sampling speed of Espressif’s ESP32 onboard ADC.

The benchmark was performed on the following Hardware:

Platform: Espressif 32 -> NodeMCU-32S
System: ESP32 240MHz 320KB RAM (4MB Flash)

The firmware for the benchmark was build using PlatformIO with the Arduino framework. To get a fast access to the hardware, the Espressif IoT Development Framework was used for all ADC specific function calls.

#include <chrono>
#include <Arduino.h>
#include <driver/adc.h>

void setup() {
  Serial.begin(115200);
  adc1_config_width(ADC_WIDTH_BIT_12);
  adc1_config_channel_atten(ADC1_CHANNEL_0, ADC_ATTEN_DB_11);
}

void loop() {
  const uint16_t samples = 10000;

  auto t1 = std::chrono::system_clock::now();

  for (uint32_t i=0; i<samples; i++) {
    adc1_get_raw(ADC1_CHANNEL_4); // GPIO32
  }

  auto t2 = std::chrono::system_clock::now();

  std::chrono::duration<double> diff = t2 - t1;
  auto ms = std::chrono::duration_cast<std::chrono::milliseconds>(diff).count();

  Serial.printf("Samples: %u\n", samples);
  Serial.printf("Duration: %llums\n", ms);
  Serial.printf("KSPS: %0.4f", static_cast<double>(samples) / ms);
}

The results are showing that the ADC is capable of doing 27.2 ksps (27173 samples per second). This does not change when reducing the resolution to 10 or even 9 bits.

Resolution (bit) Speed (ksps)
ADC_WIDTH_BIT_9 27.1739
ADC_WIDTH_BIT_10 27.1739
ADC_WIDTH_BIT_11 27.1739
ADC_WIDTH_BIT_12 27.1739

For me this results were unexpected, since a lower resolution should decrease the sample time.

Update

In the Espressif datasheet (topic 4.1.2), the ADC characteristics shows the following maximum sampling rates.

Description Sampling rate (max)
RTC controller 200 ksps
DIG controller 2 Msps

First question: what is a DIG controller and why has the RTC/DIG controller impact on the sampling speed? Assuming the numbers in the datasheet are valid, the measured speed differ massively from this rates. The implementation of adc1_get_raw is quite complex and does a lot of hardware initialization/locking around adc_convert().

int adc1_get_raw(adc1_channel_t channel)
{
    uint16_t adc_value;
    RTC_MODULE_CHECK(channel < ADC1_CHANNEL_MAX, "ADC Channel Err", ESP_ERR_INVALID_ARG);
    adc1_adc_mode_acquire();
    adc_power_on();

    portENTER_CRITICAL(&rtc_spinlock);    
    //disable other peripherals
    adc1_hall_enable(false);
    adc1_fsm_disable(); //currently the LNA is not open, close it by default
    //set controller
    adc_set_controller( ADC_UNIT_1, ADC_CTRL_RTC );
    //start conversion
    adc_value = adc_convert( ADC_UNIT_1, channel );
    portEXIT_CRITICAL(&rtc_spinlock);
    adc1_lock_release();
    return adc_value;
}

So, the hardware might be capable to provide the claimed speeds but definitely not when using Espressif’s IDF as described in their documentation.

Airplay mirroring with HDMI dongles

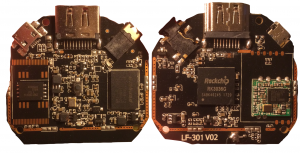
I was interested in how Apple AirPlay screen mirroring is implemented in this super cheap Chinese HDMI dongles. Apple’s protocol is closed source and was reverse engineered back in in 2004. I couldn’t find an up to date open source project which implements a AirPlay server supporting screen mirroring. So lets see what this HDMI dongles have under the hood.

I purchased a device from ELEGIANT. I think there are also devices, sold under a different brand which are based on the same hardware.

Hardware

Just a quick summery of the found hardware components.

CPU

Rockchip RK3036G
ARM Cortex A7 dual core

RAM

128MB DDR3 SPI
Winbond W691GG6KB

Flash

16MB SPI
Winbond W25Q128BVIG
ID: 0x00ef4018

WiFi

Realtek RTL8188ETV
Connected via USB interface

Read More

Automatic check for expiring SSL certificates

A quick solution to periodically check your certificates for expiring and get a notification via mail before they expire. I have multiple PKI’s and found it really useful to have such a automatic service.

The tool ssl-cert-check, which is part of the Debian package repository, does a quite good job finding expiring certificates but unfortunately doesn’t support analyzing directories. Luckily the author of this tool implemented this feature in the latest version available on GitHub.

First we have to clone the repo to have the latest version available on our system.

cd /opt
git clone https://github.com/Matty9191/ssl-cert-check.git
ln -s /opt/ssl-cert-check/ssl-cert-check /usr/local/bin/

I created a small shell script which does the actually check and send a mail if a certificate will expire in <=60 Days. Gist also available here.

#!/usr/bin/env bash

SH=$(readlink -f "${0}")
SH_PATH=$(dirname "${SH}")

CERT_DIR="${SH_PATH}/certs/*"
EXP_DAYS=60

SENDER="certs@foo.bar.com"
SEND_TO="root@foo.bar.com"

ssl-cert-check -a -d "${CERT_DIR}/*.crt" -q -x ${EXP_DAYS} -E ${SENDER} -e ${SEND_TO}
exit $?

I placed the script within the ssl-cert-check folder. The script will check all certificates in the subfolder certs. Here is the folder structure:

drwxr-xr-x 2 root root 4.0K Feb 13 18:29 certs
-rwxr-xr-x 1 root root  280 Feb 13 18:42 check-certs
drwxr-xr-x 8 root root 4.0K Feb 13 18:16 .git
-rw-r--r-- 1 root root  15K Dec 17 12:56 LICENSE
-rw-r--r-- 1 root root 3.3K Dec 17 12:56 README.md
-rwxr-xr-x 1 root root  31K Feb 13 18:16 ssl-cert-check

To include certificates, we just need to create a symlink in the certs folder. I added links to my easy-rsa PKI’s to include them.

lrwxrwxrwx 1 root root 27 Feb 13 18:29 ipsec-pki -> /etc/ipsec.d/pki/db/issued/
lrwxrwxrwx 1 root root 27 Feb 13 18:27 openvpn-pki -> /etc/openvpn/pki/db/issued/
lrwxrwxrwx 1 root root 25 Feb 13 18:22 root-pki -> /var/certs/pki/db/issued/

For a periodically check, we finally need to add the script to the cron daemon. For a daily check:

ln -s /opt/ssl-cert-check/check-certs /etc/cron.daily/

Disable serial console in Debian

Especially for not physically owned servers, like virtual servers, it makes sense to not only set the focus on SSH security. For virtual servers it’s quite common to have a virtual serial console which is accessible over your server control panel.

If someone grands access to this server control panel, the user has direct access to the system logon. Login control, like limit access to public key authentication, is part of SSH and is not active here. Because you shouldn’t trust the sever provider in terms of perfectly implemented security, it’s a good practice to also take this channel into account.

One solution is to completely disable the serial console after system boot. This makes a booted system inaccessible over the serial console. The following configuration is working on Debian with systemd.

Modify /etc/systemd/logind.conf and set ReserveVT and NAutoVTs to 0. This controls how many virtual terminals are reserved or allocated by the system.

#  This file is part of systemd.
#
#  systemd is free software; you can redistribute it and/or modify it
#  under the terms of the GNU Lesser General Public License as published by
#  the Free Software Foundation; either version 2.1 of the License, or
#  (at your option) any later version.
#
# See logind.conf(5) for details

[Login]
#NAutoVTs=6
ReserveVT=0
NAutoVTs=0
#ReserveVT=6
#KillUserProcesses=no
#KillOnlyUsers=
#KillExcludeUsers=root

Disable tty1.

systemctl disable getty@tty1.service
service getty@tty1.service stop

The status of the disabled service should be like this.

service getty@tty1.service status
● getty@tty1.service.service - Getty on tty1.service
   Loaded: loaded (/lib/systemd/system/getty@.service; disabled)
   Active: inactive (dead)
     Docs: man:agetty(8)
           man:systemd-getty-generator(8)
           http://0pointer.de/blog/projects/serial-console.html

After rebooting the system, you can still see the system boot including GRUB (boot loader) and also interrupt the system boot procedure. But after a complete system boot, the running system is inaccessible from the serial console.

Debian mdadm post boot assemble

After the upgrade to Debian Stretch, I had problems getting my raid volume with external bitmap assembled. After assembling, definition in /etc/mdadm/mdadm.conf, the array was created without the configured eternal bitmap.

ARRAY /dev/md0 metadata=1.2 bitmap=/var/lib/mdadm/bitmap-md0.bin UUID=aaaaaaa:bbbbbbbb:cccccccc:dddddddd name=server:Raid1_00

Reason for this “Issue” was the fact that the mdadm assemble is done in the initramfs during the boot. In this stage, the volume for the external bitmap doesn’t exist yet.

To solve this, we need to disable the mdadm assemble during boot. The following steps describe how to configure mdadm to assemble an array after booting the kernel and support an external bitmap.

Add an external bitmap to the array.

mdadm --grow --bitmap=/var/lib/mdadm/bitmap-md0.bin /dev/md0

Disable the initramfs mdadm hook.

#!/bin/sh
#
# Copyright © 2006-2008 Martin F. Krafft <madduck@debian.org>,
#             2012 Michael Tokarev <mjt@tls.msk.ru>
# based on the scripts in the initramfs-tools package.
# released under the terms of the Artistic Licence.
#
set -eu

# disable hook
# no boottime mdadm assemble
exit 0

PREREQ="udev"
prereqs()
{
    echo "$PREREQ"
}

Update the initramfs.

update-initramfs -u

To check the current initramfs you can do the following.

mkdir /tmp/initramfs
cd /tmp/initramfs
zcat /boot/initrd.img-3.8-trunk-amd64 | cpio -idmv

After reboot you should find the assembled array with enabled external bitmap.

cat /proc/mdstat
Personalities : [raid1]
md0 : active raid1 sdb1[2] sdc1[0]
 976629760 blocks super 1.2 [2/2] [UU]
 bitmap: 0/466 pages [0KB], 1024KB chunk, file: /var/lib/mdadm/bitmap-md0.bin